Color Label Solutions

Color Label Solutions
www.colorlabelsolutions.com

Sunday, July 25, 2021

Preroll Label Applicator

“From label design to fully applied labels, the cannabis market is a great place to deploy a print and apply solution.  The Epson C6000A printer and the LabelMill LM1005 combination is an affordable way for cannabis manufacturers to print and apply labels to their packages”, says Chris Wachter of LabelMill.

Preroll Label Applicator

LabelMilhas been producing custom labeling solutions for 30+ years. From Concept to Final Product, their Modular Labeling Systems are Quick to Deliver - Easy to Service – Easy to Use; producing more uptime for production lines, reducing the cost of spare parts and making employee training easier.

I’ve written about LabelMill in the past; focusing on their unique tube label applicator.

LabelMill 1005
LabelMill 1005 For Prerolls

But now, we’re selling a print and apply labeling system featuring the LM1005 for preroll tubes in cannabis.  Watch the C6000A printer along with the LM1005 apply labels to preroll tubes.


I’ve found this print and apply system works great for preroll tubes.  According to Chris, “Preroll tubes are generally harder to apply labels given the typical tapered design and attached caps.  Placing a rectangle label on a taper tube can produce wrinkles in the label.  With the adjustable carriage on the LM1005, we can move the idle rollers up and down the shaft to make label placement precise.  This capability makes label application to preroll tubes easier to do.”

The standard carriage used on the LM1005 has two adjustable idle rollers.  These rollers can be locked on either side, which means that you can simply squeeze the rollers closer together on one end to help combat the taper of the tube.  If the taper is significant enough, we can also make custom rollers to match the taper of the tube, but adjusting the rollers is pretty uncommon.

LabelMill 1005 Idle Rollers

And less chance of a label wrinkle:

LabelMill 1005 Applied Label

In the video, you can see how the LM1005 applicator controls the production of the “loose-loop” of labels from the C6000A printer.  LabelMill design this print and apply solution with a cable for the applicator to send a signal on when to print more labels.  Controlling the label printing is very important in any print and apply system; but especially in loose-loop designed solutions.

Continuing, Chris says, “Prerolls tubes are a great application for print and apply systems.  With the high-quality design of cannabis labels along with the regulatory requirements for variable data, full color print and apply is a very efficient process as most cannabis manufacturers produce in batches.  Print on-demand and apply enables cannabis manufacturers to produce high quality designed labels with control of the unique data on each one.” 

LabelMill 1005 Applied Label To Preroll Tube

When asked, what advice would you have for users of the LabelMill print and apply system, Chris says, “Once set up properly, I recommend to our customers that they use High-Quality labels.  Make sure the labels are cut to the proper depth and don't use a too aggressive adhesive.  Good labels will reduce other costs like lost time and obsolete inventory which more than make up for any incremental expenses.

Print and apply of labels for preroll tubes make total sense to me. This solution is efficient and effective; increasing the productivity of your operation.  Plus, this system assures that every label is placed in the same place each time; improving the look and quality of your product.

If you make preroll or apply labels to any similar packaging, contact us to discuss how the C6000A and the LabelMill LM1005 print and apply system can work for you.

Guy Mikel
855-962-7670


Thursday, July 15, 2021

L801 Printheads

After working with inkjet label printers for many years, one thing I’ve learned is that inkjet printer nozzles will occasionally plug.

L801 Streaks
L801 Printhead Streaks

I’ve written about preventing plugged nozzles on the C7500 printer:


And I’ve written about the costs of consumable printheads with the Kiaro printers:

But I’ve not written about what to do if a L801 printhead nozzle gets clogged; or how to prevent clogged nozzles on these printers. This post is designed to help L801 users (and users of any similar Memjet-based printers; Afinia L701, Afinia L901, VIP 650, VIP 700, etc.) prevent clogged nozzles as well as explain what to do if nozzles get plugged in the printhead.

Afinia L801 Label Printer

Keeping L801 Printhead Working


Label Rolls Packed In Plastic Bags

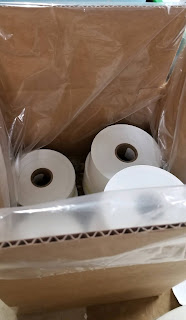
The number one recommendation to keep your L801 printer free of plugged nozzles is to keep your labels clean and in the original packaging as well as the room in which the printer sits clean.  Most of the material that plugs inkjet nozzles comes into the printer from the label media.  Generally, label rolls are shipped inside a plastic bag; and inside a box.  Keeping the rolls inside the bag limits the amount of dust that gathers on the roll; and prevents humidity from affecting the quality of the labels as well.  Keeping the room generally clean limits the dust in the printers as well.  Limiting the dust into and on the L801 printer is a good idea to keep your printhead working as long as possible.

Maintain Humidity-L801
Maintain Humidity

Number two; maintain sufficient humidity in the room with the L801 to prevent the nozzles from drying out.  Memjet, the maker of the L801 print engine recommends a minimum of 45% humidity.  This recommendations can make a big difference; especially in dry climates and during the winter months.

Number 3: Keep the L801 powered on if you use it within 6 days or less.  By keeping the printer on, the printer services the printhead; running ink into and through keeping the nozzles moist.  If the printer will not be in use for 7 or more days, remove the printhead following the directions and place it in the orange shipping cup in distilled water.

L801 Media Path
L801 Media Path

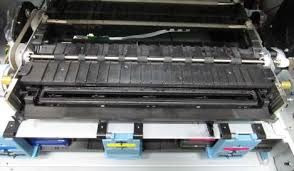
Number 4: Perform regular maintenance.  Clean the media path of paper dust by using a wet wipe or small vacuum.  Open the clamshell with the media ejected and clean the top and bottom of the paper path as much as once a day given your print volume. Be careful when cleaning the star roller platen; go with the rollers, not against them. And remove any adhesive that may build up inside the printer especially around the cutter.

Clean L801 Printhead

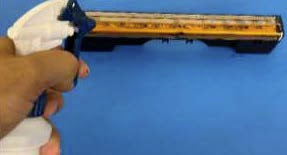
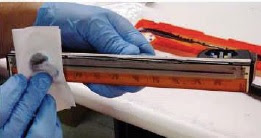
Number 5: Clean printhead manually occasionally.  Use distilled/deionized water on a lint free cloth to wipe the printhead after removing it from the printer. Never touch the nozzles with the moist cloth, however.  Wipe in one direction with the moist cloth. To remove the printhead, select Configuration, #3 Printhead, #2 Replace on the Control Panel.

L801 EWS
L801 EWS

Number 6: Change Servicing Level.  Change the “Mid Job Servicing Interval” to Maximum in the toolbox under "Advanced Settings 1". This setting will allow the head to service more frequently which reduce the likelihood of plugged nozzles. (See table 2 in the L801 User Manual on page 36).

Number 7: Check Unused Nozzle Setting in the Embedded Web Server (EWS):  Check to make sure the setting "Keep unused nozzle wet" isn't disabled.  This setting is in the Advanced Settings 1. (See table 2 in the L801 User Manual on page 36).

The seven recommended steps/procedures will help keep your printhead functioning properly and as long as possible.  Do what you can/when you can to follow these recommendations as much as possible.

But sometimes, you can get a plugged nozzle even following these recommendations.  If you do find streaking from a plugged nozzles, follow these recommendations.

L801 Control Panel-Clean Printhead

First, complete a normal clean.  From the LED, select Configuration, #3 Printer 1, #1 Clean and then Normal.  Then complete another print to see if the streak remains. (See page #52 of the L801 User Manual).

Second, if the streak remains, complete an Extended Clean (follow above directions selecting “Extended”).

Third, if streak remains, clean the printhead following the directions above.  In addition, clean the PRINTHEAD Contacts.  Turn off the printer, and wipe the contacts in a vertical manner using a moist lint free cloth.

Fourth, if the streak remains, you may decide to complete an Extreme Cleaning.  However, select this option carefully as it consumes a lot of ink.  Generally, I recommend the next step in advance of the Extreme Cleaning option.

Soaking L801 Printhead

Fifth, soak the printhead overnight in distilled water.  Fill the orange cup in which the printhead ships with distilled water and then placed the printhead in the cup.  This step rehydrates the printhead. Plus, it’s a good way to store the printhead if the printer is not in use for more than 6 days.

Wipe L801 Printhead
Wipe L801 Printhead

Sixth, wipe nozzles as mentioned above using a moist, lint-free cloth. Wipe in one direction with no pressure.  This step may rehydrate the plugged nozzles.

If none of these steps fix plugged nozzles, then a new printhead is required.  As the printheads are a consumable item, replacements are required occasionally. 

In addition to plugged nozzles, I’ve learned one other item may cause streaking.  As the printhead ages, lines may appear approximately every ¾” along the web where the zones of the nozzles meet.  These lines are referred to as “Die Lines”.  These die lines are most noticeable in light, pastel or sky-blue colors. In addition, these die lines appear more on certain materials.  For example, gloss BOPP has very little “Dot Gain”; meaning the ink stays in a tight, small dot which makes the die line more likely to appear.  On other materials such as paper, the ink migrates or spreads out evenly; potentially overlapping the other dots, reducing the likelihood of a die line effect.  Over time, these die lines can’t be fixed and require a new printhead.  Following the recommends on maintaining the printhead will make this consumable item last as long as possible.

By following some or all of these recommendations, you can maintain your L801 (and related Memjet-based printers) printheads and potentially, unplugged nozzles.  Knowing and following these steps will reduce the possibility of streaks in your label printing.

Contact us if we can help with your L801 or any other label printer.

Guy Mikel
855-962-7670

Monday, July 12, 2021

Higher Speed C6000

In the spring of 2020, Epson started shipping the C6000 series printers.

C6000 Series Printers

I wrote about the launch of these new printers during the fall prior.

And my first, out of the box, experience. 

Overall, I’ve found these printers to print high quality labels and be affordable.  But slow.

Epson has now released a driver change that, according to them, increases the speed of larger, batch printing by at least 20%.  That’s significant.

Let me explain the procedure you should use to realize this increase in speed.  First, I recommend you update the firmware in the printer.  It may NOT be required for this speed increase; but it’s a good thing to do before making any other changes.  Get the latest firmware here:


(I didn’t include the “P” versions as we’ve sold primarily “A” printers with a cutter.)


Second, update the driver to version 1.4 (or later if available).  Get the driver on the same link as listed above.  Don’t worry about updating the driver with the previous version installed. (FYI: I had to restart my computer after updating the driver to get this feature to work).

Third, select “High Speed Batch Printing” in Driver Preferences on the Driver Utilities tab of the driver.

C6000 High-Speed Batch Setting


And then print a minimum batch size of 60 cm or about 24”.  The time to print 10, 4x3” matte poly labels printed using NORMAL setting and the high-speed setting not selected was about 30 seconds (~1”/second).  To print the same amount with the High-Speed Batch Label selected was 21 seconds (~1.4”/second); a reduction in time of 30%. (FYI: I should have measured the time before updating the driver and firmware to see if it was different).  

Watch me print 10 here in the High-Speed Batch Mode at the NORMAL setting.


Notice how the LED shows only 2 pages printed.  From 10 labels to only 2.

One point: on my first try, I got a skipped label.  It occurred between page 1 and 2 of the batch.


As I normally set up the page size of a label .03” wider and longer than the actual label, I figured this .03” extra times 10 labels caused the printer to skip the gap.  Changing the page size to exactly 3” tall, eliminated this missed label.  Therefore, you may not be able to use this feature when printing full-bleed labels.

Completing the same test using the MAX SPEED setting, it took 14.5 seconds (2.15”/second) to print 10, 4 x 3” matte poly labels.  With the High-Speed Batch Label Printing selected, it took only 9.5 seconds (3.29”/second) to print the 10, 4 x 3” matte poly labels.

How This Feature Works:

Normally, the C6000 series printers send 1 label image down to the printer at a time.  10 labels would be 10 images.  In the High-Speed Batch Label Printing mode, the printer creates a batch of 60 cm and send it down as 1 image; thus speeding up the print.  It seems like a creative way to speed up printing.

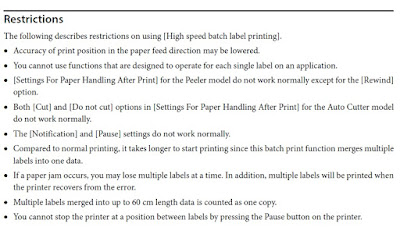
Epson does list some restrictions to make this work correctly.  For most, the NO CUT option could be an issue for some operations.

C6000 High-Speed Restrictions

To learn more about this setting, review page 112 in the Technical Reference manual.  Get the manuals on the same URL as the drivers; just select “MANUALS and WARRANTIES” tab on the Support page.

According to Dennis Moore, Epson Senior Technical Support Specialist, “This feature allows the printer to printed at the rated speed of 4.8 ips over a span of 24 inches and is especially advantageous when printing small labels.  I recall during the initial testing in March that multi-page labels could be printed using the high-speed batch setting as well.  Note that the page count on the printer panel is now defined in terms of 24” collections of labels instead of individual labels."

For many organizations, I believe this setting will help speed up their operation.  At a minimum, I encourage users of the C6000 series printer to test this new feature.  If you have issues using this new feature or help with your label printer in general, contact us so we can help.

Guy Mikel
855-962-7670