Loading printed
labels and laminate into the DLF220S looks easy; right?
 |
| DLF Media Path |
For me,
however, it’s not so easy. That’s why I
asked Tony Molina, our graphic artist to help me load the DLF220S.
In my post
about Sierra Stickers; I asked our
customer Derrick, “how long did it take to get comfortable using this label
finisher?” Derrick said “two weeks to
really learn how to use this finisher”.
And Derrick is a professional printer.
You should add to this time if you don’t use it every day.
Frankly, I’ve
avoided learning how to use the DLF as I’ll never use it every day. This post is designed to share some insight
into threading the DLF220S media path; and not to make you an expert.
 |
| Load Printed Labels/Laminate |
First load the printed labels and
laminate onto the spindles and tighten the label core holder.
 |
| Lock Coupling Roller |
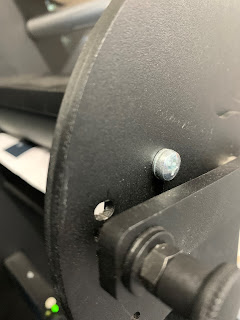
Second, insert the labels into the
coupling rollers and lock the knob. Afinia suggests using the 2nd
hole from the left (which we didn’t do as shown by the picture above).
 |
| Attach the Laminate |
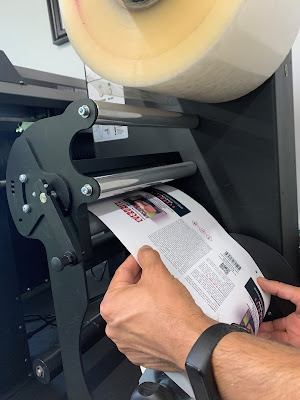
Third, pull down the laminate with
both hands, centering it onto the label media. And then tighten the laminate
core holder. Make sure to adhere the laminate to enough of the paper area so as
to not have it come apart when you first advance it through the coupling
rollers.
 |
| Attach Laminate |
Tony prefers to place the laminate
onto the guide roller to help smooth and center the laminate, then supporting
the paper from below against the guide roller to ensure easy alignment of the
laminate to the roll of paper.
 |
| Advance Labels/Laminate |
Fourth, use the manual button to
advance the label and laminate. Be prepared for the noise of the laminate
coming off the roll.
 |
| Under Damper/Into Rollers |
Fifth, run the labels under the damper
arm and up through the aluminum rollers. Adjust the edge guides to maintain the
media straight.
 |
| Into Cutter |
 |
| Align Edge |
Sixth, lift the handle or latch on the
rear of the plotter and push the media through the two pinch rollers. Align
the media by having the edge of the media touch the edge of the silver sticker
alignment points.
 |
| Push Thru Cutter |
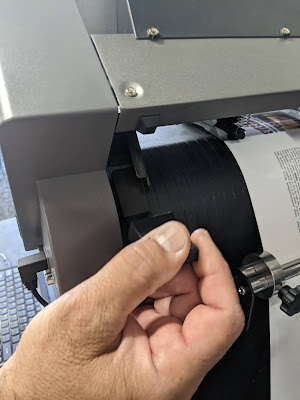
Seventh, move the pinch rollers to the
media edges on both sides. You can move them manually as long as the handle or
latch is up in the unlock position.
The entire surface of the pinch
rollers needs to make contact with the media surface edge on both sides.
 |
| Close Lever |
Eighth, close/lock the plotter by
pressing down on the handle or latch securing the media.
 |
| Select #2 |
Ninth, select #2 on the plotter
display.
Open the DLF software, and then from
within the DLF software open the PDF CUT FILE.
Measure the distance from the leading edge of a black mark to the
leading edge of the next black mark on the printed media. You need to be as
accurate as possible.
 |
| Enter Blackmark Distance |
In the “DISTANCE BETWEEN BLACK-MARKS”,
enter the distance in mm.
 |
| Advance Blackmark |
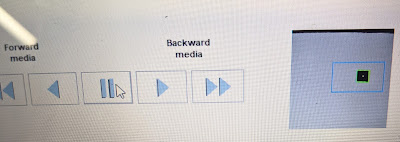
Use the forward media single arrow
button to slowly advance the blackmark into the camera square shown in the
software. The double arrow button advances the media much faster but is harder
to control. You want to align the black
mark in the center of the blue box as much as possible.
Prior to running a CUT TEST, check the
plotter knife using the loop that came with the DLF unit.
 |
| Check Plotter Knife |
The blade should be set to hit the 3rd
mark from the bottom seen in the loop.
If the blade cuts the liner, change
the CUTTING FORCE on the DLF software. (You may need to remove the die-cut label
to confirm the cut depth. In this training session, we had to change the cut
force from 11 to 9. You can continue to do the cut test until the correct depth is found.)
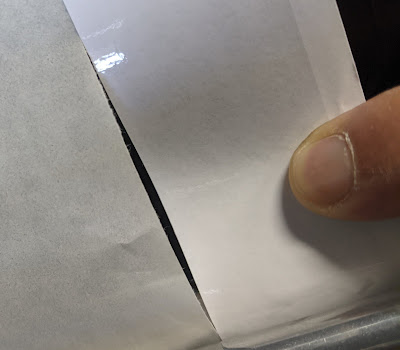 |
| Cut Too Deep |
NOTE: At this
point, it is very important to remember that before you run a CUT TEST, the
Media Tension Control needs to be activated and set to AUTO. Then select CUT TEST.
 |
| Activate Media Tension |
Eleventh, something that we didn’t do
in my training was to correct the offset in the software to make sure the label
is aligned with the die-cut. You can
move the cut in all directions; and then complete cut tests until aligned
correctly. My guess is we got lucky. We
didn’t have to correct the offset in our training session because the label
aligned with the die-cut line perfectly after our first cut test.
 |
| Adjust Media Offset |
Once completed, select “COPY MODE ON”
to preselect the number of copies you want.
At this stage, we still wanted only a few to ensure the cut is correct.
Now we get into the hard part of the
media path (at least I found this part difficult).
 |
| Place Thru Rollers |
Twelfth, run the media down through the aluminum
rollers. Adjust the edge guides to
maintain the media straight.
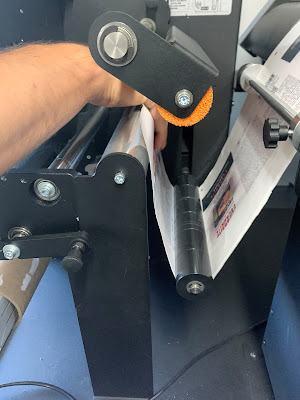 |
| Thread Under Damper |
Thirteenth, run the labels under the second
damper arm and up and over the thick aluminum roller, down and under the thin
roller as shown on the photo below.
 |
| Place Over Roller Into Slitter |
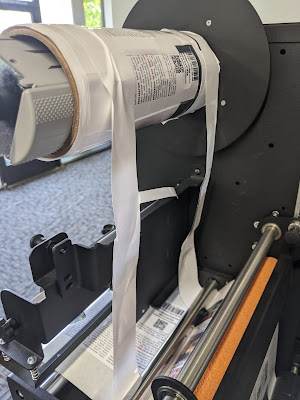
Fourteenth, place a core onto the
waste rewinder; then the pull off the waste matrix once the labels are fed
under the roller and connect it to the core.
 |
| Connect Waste Matrix To Core |
Then you can push down the waste
press. And then close the sponge roller. I’ve seen users run the waste from the
outside edges into a garbage can; or can be connected to the waste roller.
 |
| Attach To Core |
Fifteenth, connect the die-cut labels
to the core(s) on the rewinder making sure the label media rewinds evenly.
Sixteenth, position the slitters in
the correct positions on the sides, and in cases where you are die-cutting
multiples labels across the media, you would position the slitters in between
the labels as well.For this, you may need to purchase
more slitters.
At this point you need to TURN ON the
Waste Remover.
Seventeenth, If needed, you can set
the backslitters which also cut the outside edges of the finished label media correctly. Frankly, this step seemed the most difficult
to me as you have to work behind the media path. Knob “A” moves the backslitter; knob “B” sets
the cut depth.
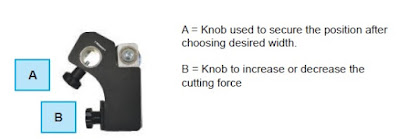 |
| Set Backslitter |
Eighteenth, Lock
the backslitter lever in place by placing the pull-pin on the left side hole.
(the backslitter lock pin-hole on our DLF needs some work).
After all of
these steps, you can run the job.
And here is a video of the DLF220S cutting Circle Label.
To see Afinia’s
official directions, download the DLF-220S User Manual here:
In this simple
stepwise recommendation, I attempted to make a relatively complicated process
easy. It doesn’t include possible
adjustments required to get the die cut exactly correct; or how to set up the
art/cut file. But I hope it helps you
speed up the process of becoming comfortable running the DLF220S. And help you reduce the waste produced in
training to use this machine.
Tony says, "No doubt, the DLF2220S is a great tool to have at your disposal
when laminating custom-size die-cut labels. Once you get past that
learning curve that every new user has to experience, the DLF220S will produce
beautiful custom die-cut labels. Compare to other large format printers,
this puppy is relatively fast, compact, and easy to use. Again, once you figure
out how everything works and you get the machine dialed in, the sky is the
limit for creating any shaped-size label"
I’m lucky to
have Tony work with me/us on the DLF220S.
He was very patient with me; and a lot of help.
Together with
the L801, the DLF220S can help you make the labels you need, when you need
them; and at some of the lowest costs available. If you need to make a lot of different
labels, contact us to learn more about the DLF220S.
Guy Mikel
855-962-7670

