Printing Circles correctly can be difficult. But one, mostly overlooked, feature of the
new C6000 series of label printers from Epson is the movable gap sensor.
 |
| C6000 Movable Gap Sensor |
Epson did not mention this feature in their C6000 series press release:
Epson does not mention this capability on the main C6000 product webpage:
Epson doesn’t mention this feature until the 4th page in
small type in the collateral material:
 |
| C6000 Movable Gap Sensor Copy |
But the movable gap sensor may be the most used and important feature on
the C6000; especially if you print circle labels. Now you don’t need blackmarks on labels to
print circle labels correctly.
 |
| C6500P Printed Circle Labels |
This post is designed to help you start printing circle labels correctly
using the new C6000 series printers by moving the gap sensor.
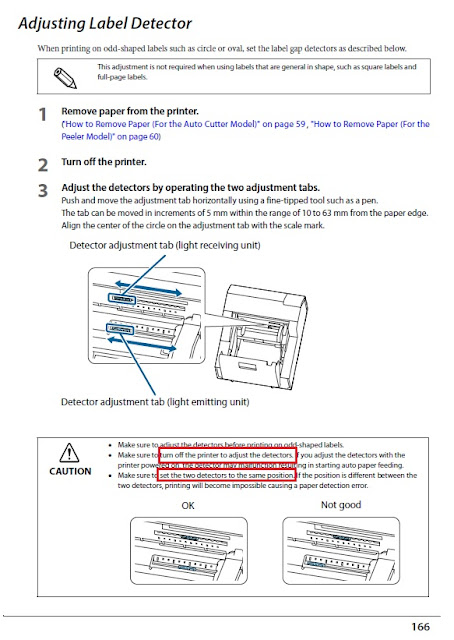
Most importantly, TURN OFF the printer to move the gap sensors. And make sure the TOP/BOTTOM sensors are aligned.
 |
| C6000 Aligned Gap Sensors |
The first time I tried to use the movable gap sensor feature, I failed on
following both of these requirements. It took forever to figure it out;
including having to read the instructions.
Find them on page 166 of the Engineering manual.
 |
| C6500 Label Detector Instructions |
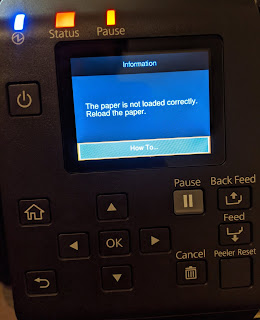
If you don’t align the sensors correctly, you get this error on the
printer:
 |
| C6000 Gap Sensor Error |
And in fact, I thought I had the sensors aligned correctly; but kept
getting an error. It seems sometimes the
printer had issues with the movement of the gap sensors once the printer was
turned back on. I just turned it off
again and adjusted the sensors to get it to work correctly.
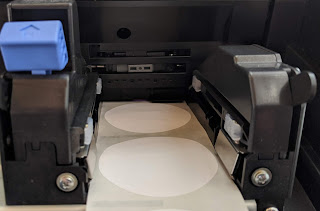
On circles, the idea is to move the gap sensors to align with the apex
of the leading edge of the circle. To make
this change, I would follow these steps:
- Use the LED menu on the printer to adjust the media settings to the new label (I recommend using the LED menu on this printer and not the driver).
- Media Type: Matte Paper, etc.
- Media Detect: Gap or Blackmark
- Media Source: Internal or Rear Feed
- Media Form: Roll or Fanfold
- Turn off the printer
- Load the new label media to set the widths of the guides; then remove
- Move the gap sensors to the center of the new label media.
- Turn on printer.
- Load label media
 |
| C6500 Gap Sensor Set Correctly |
To print circles, especially multiple up circles, I recommend using
BarTender. This label creation and
printing software makes circle label printing much easier to do than with
static PDF’s or other file types. With BarTender,
I can adjust easily the settings for printing circles; such as rows/columns of
labels and gap between:
 |
| BarTender Circle Settings |
In addition, you can embed the image in the background and easily add
an “overhang” to the print, which makes printing full-bleed much easier to do.
 |
| BarTender Background Image Overhang |
 |
| BarTender Label and Template Size |
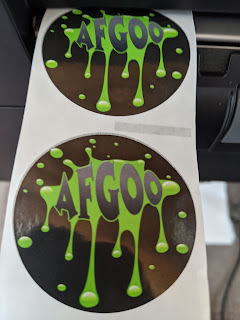
With BarTender and the movable gap sensor, I printed 1” 2 Up circle
label above earlier in the post, and 2” circle labels:
 |
| 2" Circle Labels |
And 1” clear film circles 6 UP using the blackmark sensor:
 |
| 1" Clear Film Circle 6 UP Labels |
(FYI: the minimum 1" print width feature of the C6000 series eliminates the need to print small sizes multiple up!)
During an attempt to print circle labels with a blackmark directly between (Kiaro and QL-120 require this blackmark location),
I learned the gap sensor would not function.
The blackmark affected the reading of the gap. By changing to the blackmark sensing, I could
print 3” circles as well.
 |
| 3" Circle Label Using Blackmark |
All of the different sizes and especially the blackmark in the middle
of the gap required me to change the print start position; both vertically and
horizontally. To change the print start position,
go into the printer setting utility and select the vertical or horizontal
setting.
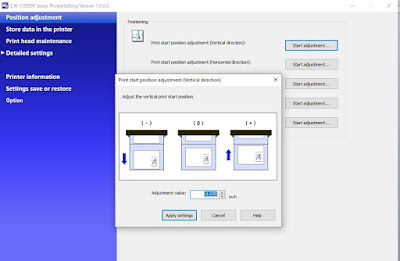 |
| C6500 Vertical Start Position |
Please know; the C6000 series offers a great deal of mobility in terms
of the movement of the vertical print start position. For example, more than a .25” with the label
with the blackmark directly between the labels.
However, the C6000 series is limited to .06” horizontal movement; which
sometimes is not sufficient to print full bleed. If the horizontal movement is insufficient
for full bleed, try reloading the labels or adjusting the artwork to achieve
full-bleed on both sides.
Printing circles correctly can be difficult and frustrating; trust me I
know. But the movable gap sensor on the
C6000 printer makes printing these labels much easier to do. Purchase the C6000 Series Label Printers here.
Or contact us to discuss how the C6000 series printers
can make your work life easier.
Guy Mikel
855-962-7670
info@colorlabelsolutions.com

No comments:
Post a Comment