Color Label Solutions

Color Label Solutions
www.colorlabelsolutions.com

Sunday, March 19, 2017

Label Color Management-Reader/Acrobat

Color Label Solutions prints and send label samples out most days.  And I’d say most of these samples are printed from Adobe Acrobat in my case.  However, many of our customers print from Adobe Reader.  These customers create artwork in Adobe Illustrator, Photoshop or some other application before saving as a PDF.


While at a customer site this week, I decided to test some of the other Adobe Color Settings; as the colors in the initial print output were different from the C7500G versus the customer’s standard printer. By accident, I’ve found an additional way to improve color matching.  I’m sure many graphic artists understand these capabilities; but I did not.

In the past, I posted on using the ColorTone Matching assistant and/or the Wasatch RIP available in the C7500GE to improve color matching. 


But for many of you, selecting a different setting in Adobe Reader or Acrobat may give you “close enough” or sufficient color matching.  Let me explain further.

In the print dialog box of Adobe Reader, you can find the “Advance” button.

Adobe Print Dialog Box

In the Advance dialog box, you’ll find 3 basic options for color printing.

Adobe Reader "Advanced" Print Dialog Box

  • Let Printer Determine Colors Checked
  • Let Printer Determine Colors Unchecked (PDF Determines Colors)
  • Print as Image

In addition, you can select “Preserve CMYK Primaries” and “Preserve Black”.  However, I didn’t notice any difference with these selections alone.

With the above label artwork, I found a difference when printing as an image.  The green was darker, and maybe more yellow when printing using the setting “Print As Image”.

In Acrobat, I found Adobe provides many more options for color management; with 4 basic types:

  • Printer Color Management
  • Same As Source
  • Adobe Color Management
  • Print as Image


When Printer Color Management is selected, Acrobat says “Color Handling determines if color management will be used, and if so, whether it happens in the application or at the printing device. When 'Printer' is selected, convert any ICC profiles to PostScript CSAs, and color will be managed in the printer RIP.

With Same As Source is selected, Acrobat says “Color Handling determines if color management will be used, and if so, whether it happens in the application or at the printing device. When 'Same as Source (No Color Management)' is selected, embedded profiles are ignored, and only device values are sent.

When Acrobat Color Management is selected, Acrobat says “Color Handling determines if color management will be used, and if so, whether it happens in the application or at the printing device. When 'Acrobat Color Management' is selected, select an ICC Profile that describes the target output device.”

In my version of Acrobat, I count 42 different ICC profiles available when selecting Acrobat Color Management.  Although not printing using all of the available profiles (some are black/grey’s only), I did find differences. With most of the profiles, I did not see a difference using this artwork and label media.

Acrobat Color Management Profiles

Using ColorMatch RGB (Matches the native color space of Radius Pressview monitors.  This space provides a smaller gamut alternative to Adobe RGB (1998) for print production work), I found a darker green with this artwork.

Acrobat ColorMatch Profile
And I found the same print output using Apple RGB: (Reflects the characteristics of the average Mac OS monitor, and is used by a variety of desktop publishing applications, including Adobe Photoshop 4.0 and earlier.  Use this space for files that you plan to display on Mac OS monitors, or for working with legacy (older) desktop publishing files.)

In addition, I did see a difference by selecting “Printer Color Management”.  I’ve decided to make this setting the default.

For those of you printing with Adobe Reader or Acrobat, I encourage you to test your artwork with the variety of settings and maybe label media to see if you find a difference in color of your print output.  You may find a better color matching option.

And for those of you we’ve sent samples, forgive me if the color wasn't exactly correct.  Maybe I could produce better color matches now.

Guy Mikel
855-962-7670

Wednesday, March 1, 2017

Edible Love

Love’s Oven (www.lovesoven.comproducts are produced with the highest quality all-natural ingredients that are sourced locally (Colorado beet sugar) and organically (organic coconut oil) whenever possible. Their proprietary THC & CBD extraction methods ensure that you receive a consistent and effective dose of cannabutter/cannaoil Love in every bite.


Love’s Oven was born in 2009 with a promise to its patients to provide great tasting cleanly extracted products to help with their chronic pain and other ailments.  If you look at the label of any of their 15+ products you’ll never find any ingredients that you need to have a chemical engineering degree to pronounce. Ingredients like crystallized ginger and honey roasted peanut butter are about as complicated as it gets.  Love’s Oven has built its reputation by crafting their products in a state of the art facility in Denver where their food safety and quality assurance programs guarantee you’ll receive a potent and delicious product that can be found throughout Colorado.

In the fall of 2016, Colorado issued new label requirements that caused Love’s Oven to change their labeling procedures. According to Katie Wrank, Administrative Assistant & Marketing, “Colorado mandated that we add the Universal THC Symbol, in various sizes and colors, to each label for both medical and recreation use.  At the time, we were using a black only, DataMax thermal transfer printer adding variable data on top of five different preprinted labels in conjunction to printing some on a laser printer. This process was very frustrating and time consuming.  We had to make a change.”

Katie says, “While growing significantly, we needed an efficient and improved process to label our products. Prior to any changes, our work flow was to extract label information from the daily production list, transfer the production numbers and product information manually to the packaging order, and then type everything by hand onto our label templates. With over eighty-eight label templates requiring daily changes, our label process was at risk for human error. Plus, all these changes were too much for one person to manage.” 

To change their label process, Love’s Oven contacted Rich Arbogast of Sendata Systems, (www.sendatasystems.com). As a partner of Color Label Solutions, Rich contacted us to see if we have a solution for Love’s Oven.  Rich said, “Sendata are experts at managing data and thermal transfer printers.  But decided to work with Color Label Solutions to bring the best possible print on-demand color label system for our customer, Love’s Oven.

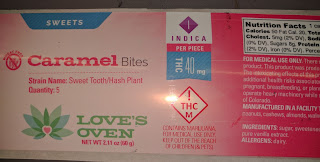
To start the process, we printed sample labels on the C7500G.  We recommended this printer given their need for a large volume of gloss labels.

Love's Oven C7500G Full-Bleed Label
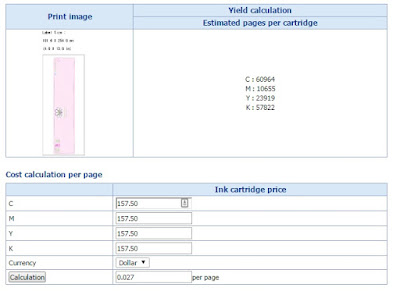
In addition, we provided an estimated ink cost of their labels.

C7500G Estimated Ink Yield
On these long, full-bleed labels, I estimated the ink cost at $0.027 per label.  Based on the samples and estimated ink costs, Love’s Oven purchased a C7500G printer.

About the C7500G, Katie says, “We now have the ability to print on demand labels quickly and efficiently. We also have the design flexibility to change our graphics on a moment’s notice.  Many of our customers love to see their logo printed in full color on products that contain their trim or flower.”


While working with Love’s Oven, I learned about their new label creation process.  Katie says, “to improve our labeling process, I decided to use a mail merge technic that I used in a former position at a large shipping and printing company. In Excel, I created a database of our products, including all the variable information: product name, ingredients, allergens, net weight, and pieces per package. This database allows us to quickly update product information such as changes to a recipe. On another tab in the Excel database, we retain information about the ingredients used during the cultivation of the marijuana, which are required by the state of Colorado. By using the VLOOKUP command in Excel, we pull information pertaining to each product, automating the data input on the production list.”

“Once we have the products compiled in one list, we use Adobe InDesign to merge the data with our artwork onto the backgrounds of our label templates. With this workflow, we can export all our labels from one file as separate PDF files which print like a dream on the C7500G.”

C7500G Label
C7500G Label
One other interesting note, Rich has worked to help Love’s Oven to print THC symbols on their brownies using white, food-grade ink.  What a great solution Rich put together for Love’s Oven.

Edible Ink Printed Brownies
“With the constantly changing Cannabis labeling/direct marketing laws and regulations required by the State of Colorado, providing the best solution to these requirements was our goal. I believe we hit the mark with the C7500G printer for the packaging labels and direct marking food grade inkjet coder for applying the mark directly to the edible products. These products are the only ones I know that can print with the quality needed for the labels, and the food grade ink for the direct marking of the edible food cannabis products.”

We’re excited by the success at Love’s Oven.  If you need a new labeling solution for your cannabis or any other products, contact Color Label Solutions.  We’ll help you meet the regulatory requirements of your industry; and produce beautiful labels in the process.


Guy Mikel
855-962-7670