On
September 14 and 15, 2016, I attended Label Expo http://www.labelexpo-americas.com/ in Rosemont, IL.
Label Expo is large; covering all types of machines and materials for producing
labels. So let me tell you about 6 new products that I found interesting.
First, Epson announced officially the new Wasatch RIP for the C7500 and
C7500G.
 |
| C7500 With Wasatch RIP |
You can learn more about the RIP here in a post from an earlier post
from this year:
Again, the RIP enables users to control colors better and produce much
better results:
 |
| C7500G Full-Bleed Label Using the Wasatch RIP |
What is interesting to me is the price.
Epson has bundled together the C7500 printer including the new firmware,
the RIP software and a year of on-site service for $9,450; only $800 more than
the C7500 printer. So for $800, you get
the RIP software and on-site service which has a list price of $1,029. It’s a great deal. According to Epson, you’ll be able to order
this bundle beginning October 31, 2016.
Be sure to contact me if you’re interested this bundle.
In addition to color controls, Epson’s new firmware/RIP enables
continuous printing. Now you can print
and use a secondary finishing unit to laminate and die-cut the labels. In the booth, Epson showed a finishing unit
from their new partner Metas:
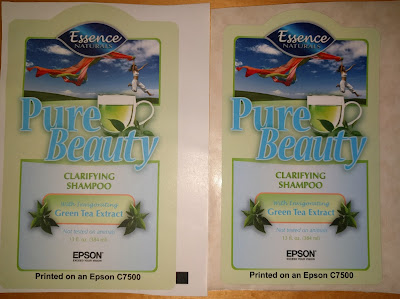
And learn more about this new finishing unit here: http://www.metas.global/. And look at the differences between a matte paper label and a matte paper label laminated:
 |
| C7500 Printed Matte Paper (L) & Laminated (R) |
At $20,000, I believe the Metas finish unit is the most affordable option to laminate and die-cut labels. The new RIP/continuous label printing capability combined with this finishing unit make the C7500 a great option for printers wanting to begin digital label printing for less than $30,000; much less than buying a $1 million press from a company like HP-Indigo.
Second, Epson showed a new round bottle semi-automatic label applicator
integrated with the C7500. Now you can
print and apply great looking labels to wine, chemical or other round bottles.
At approximately $14,000, the semi-automatic applicator takes full use
of the C7500 printer. Plus this
applicator is the only print and apply color label applicator available. This applicator works with the C7500 for two
key reasons. First, the C7500 has a GPIO
board that enables communication between the printer and applicator. Second, the applicator allows the printer to
reverse up to the 8” to 10” required by the C7500. If you need to apply labels to round
containers quickly, affordably and in the same place every time, then the C7500
and applicator combination is a great option.
Third, DPR showed a new Gemini die-cutter for sheet-fed labels. Now you can die-cut sheets of A3-A4 labels
(up to 13” x 19”) into lots of smaller labels for a limited amount of
money.
 |
| Gemini Die-Cutter |
At $6,500, you can turn a standard sheet fed color printer into a system to print any shape die cut labels on sheets. It’s a very affordable way to print colorful and complex labels. For example, printers can produce labels for their customers in just about any shape and label material. Or manufacturers can produce unique specialty on-demand when they need them. From my perspective, this machine opens up on-demand color labels to new customers.
Fourth, Afinia Label introduced the L301 label printer; a wide, high
resolution and affordable printer that should fit small volume manufacturers.
 |
| Afinia L301 Label Printer |
At less than $2,000 and using a HP printhead, the new Afinia label
printer will enable companies to print a limited number of high resolution
labels in color. I say limited as the
printer is slow and the ink cost will be relatively high. Plus the L301 uses dye based C, M, Y inks,
that are susceptible to water and other compounds. But this printer provides an easy to use
option for printing great looking labels for not much money. If you need to produce wider labels and don’t
want to spend a lot of money, the Afinia L301 label printer is an interesting
option.
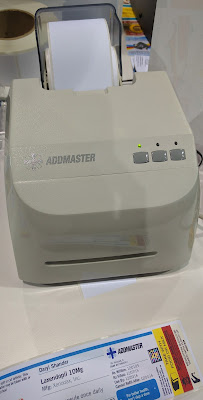
Fifth, Addmaster introduce their new sub-$1000 color label printer;
seemingly great for prescription and color code labels.
 |
| Addmaster Color Label Printer |
At 2.5” print widths, the new Addmaster printer is not for every
application. But where color codes and simple images are required, especially
for short duration labels, the Addmaster printer seems like a good option.
 |
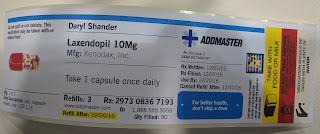
| Addmaster Label |
This printer should fit applicators such as prescription labels; with
color-coded warning message, highlighted and bold text and images. In addition, I can see how this printer may
work in manufacturing where color-coded in-process inventory labels would be of
value.
The Addmaster printer doesn’t produce masterpieces; nor is it fast. But this printer enables color-coded labels
with images at a low initial hardware price.
Sixth, Trojan Label Systems introduced a new corrugated printer; the
Trojan 3.
 |
| Trojan 3 |
And learn more here: http://www.trojanlabel.com/products/trojanthree
At $49,500, this 8” wide, Memjet-based corrugated printer is complementary to our existing corrugated printer. (See our $20,000 corrugated, CYMK printer here: www.directtocorrugated.com). And the much more expensive ($115,000), 48” Excelagraphix 4800 corrugated printer:
http://www.xante.com/product-information/excelagraphix/excelagraphix-4800/?gclid=Cj0KEQjw9vi-BRCx1_GZgN7N4voBEiQAaACKVhstS8ffDE0dli4xm1parrmoR88JdsHNYjFPOi2tfQ8aAo_D8P8HAQ
The Trojan 3 produced great looking images and text on corrugated using
the touch-screen and print engine module found in the Trojan 2 mini-press.
 |
| Trojan 3 Print |
Seemingly durable and available with RIP software, the Trojan 3 is
built for long life.
With the recent additional of several color corrugated printers, the
market for these new packaging machines will grow significantly.
Label Expo 2016 was a successful show for us; and lots of promise for
our industry. If you found any of these
new products/technology of interest, contact us to discuss how we can fit them
into your operation.
Guy Mikel
855-962-7670


