Pages

Monday, December 21, 2020

Water Dispersable Labels

According to the dictionary, Sustainability is “avoidance of the depletion of natural resources in order to maintain an ecological balance.”  We’re pleased to announce a new label material that is sustainable.

Dispersa

Dispersa® is a water-soluble paper, designed for pressure sensitive labels that disperses completely and rapidly in water with light agitation; including any imprinted or handwritten graphics.  Watch Neenah’s introductory video here:


According to Kelli Clark, Product Marketing Manager for Performance Labels, “Convenience, Safety and Sustainability are the key differences for Dispersa for our end user customers.  Safety as the labels can communicate important information, like use by and expiration dates, that will wash off completely after use avoiding confusion or improper re-use; Convenience as the labels do not need to be removed prior to washing; and Sustainability as Dispersa leaves zero waste behind and is 99% bio-based, per the USDA’s BioPreferred™ program.”


In my discussion with Kelli, I learned more about the Biodegradability of Dispersa.  According to Kelli, “Dispersa has been tested following ISO standards 17556/14852 and meets the requirements for biodegradability. Additionally, Dispersa has been tested for flushability and has successfully completed several studies indicating Dispersa can safely be flushed down the drain. Although this material will break down in soil, pursuing testing around compostability has not been an area of focus for Dispersa.”


Dispersa Certifications

When asked, what markets should consider using Dispersa, Kelli said, “Food rotation is a good market.  These labels tell retailers, food companies and consumers when to remove/pull expired product from the shelves. In addition, clothing ID or size labels are a good market as washing will remove the labels.  Reusable container labels are a good fit as well; and the labels will come off with washing.  Finally, Dispersa should work for companies who want to reduce the waste from their packaging.”

In my tests of Dispersa pressure sensitive labels, I found the material washed off quickly and easily in water.

Biodegradable Label in Water
Water Dispersible Label in Water

Also, I found the adhesive relatively aggressive on both plastic and glass:

Adhesive Test Of Biodegradable Label

I did find the print quality lower than our standard matte paper labels, but should be sufficient for many markets.  And by adding a statement about the water dispersibility of the labels, this material may support the branding of many of our customer’s products.  Plus I’ve learned that further development is ongoing to improve the print quality of this material.

Print Test Of Biodegradable Labels


When asked about the cost compared to standard matte paper labels, Kelli said, “Dispersa labels will be more expensive, but offer several key environmental benefits that are priceless to our planet.”  Another plus? The liner on these labels is biodegradable as well.

With a growing need for sustainability in packaging and labels, I’m excited to offer Dispersa labels to our customers.  Send us the size and number you need; and we’ll send you a quote. 

If you want more sustainable and water soluble, on-demand color labels, contact us.  We can help!

Guy Mikel
855-962-7670

Sunday, December 6, 2020

Sierra Label Printers

With “Nothing But Love” from their customers, Sierra Stickers, is a family-owned printer business based in Rancho Cordova, CA who produce high quality stickers.  With the motto, “Custom Stickers Done Right”, Sierra Stickers makes ordering easy and ships orders fast. 

Guy Mikel Sierra Stickers
Sierra Sticker Founders; and me with my Covid Haircut

According to Derek Alvarez, Co-Owner of Sierra Stickers, “we started making labels in March/April after we moved into our new location.  Prior to this time, we sold primarily die cut stickers; but had customers who need labels on rolls.  We started with an inexpensive label printer that didn’t work out so well; I then contacted Color Label Solutions to find a label printer option.”  Based on our discussion, Derek purchased a C6500A.”

Derek is one of the few professional printer customers we have that is using the C6500A.  Most would say that the C6500 is too slow, running about 2” per second.  Derek says, “we run the C6500 overnight to print an entire roll of labels.  Once the roll is completed, we rewind the roll to put the black eye mark on the opposite side in order to work in our Finishing System.  Our experience showed that the C6500A runs as fast as our Finishing System.  We’re so satisfied with the C6500, we got a second printer.”

Sierra Stickers-C6500
2 C6500's At Sierra Stickers

But what I was most interested in seeing was Sierra Sticker’s use of the Finishing System.  We sell the DLF220S from Afinia, but is manufactured by DPR in Italy.  A finishing system laminates, die-cuts, weeds the matrix (removes the waste matrix round the die-cut label), slits labels into columns and then rewinds into rolls. 

Label Finishing System DPR Afinia
Label Finishing System

According to Derek, “the cutter on this finishing system is extremely accurate.  Down to 1/10,000 of an inch; but we run it down to 1/50,000 of an inch.  Although the finishing systems is slow, we run it overnight as well. We now laminate almost 100% of the labels we sell.”  This video shows how important the Finishing system has become in the Sierra Sticker business. 


In the video, Derek shows the software designed to specify the cut location.  From my perspective, understanding the software is the critical path to make this equipment productive.  To generate the cut location, Derek creates a PDF with a cut layer along with a visual layer of the art.  With this procedure, the operator can see both the cut and art to ensure the finish labels are correct.

DPR Label Finisher Software
Label Finisher Software

Two suggestions from Derek.  First, don’t push the laminate all the way against the back plate. He finds the alignment easier.

Laminate On The Finishing System

Second, don’t push the cores on the rewinder to the back plate also.  This space ensures the waste from the side cuts doesn’t bind and get wrap up in the matrix.

Label Matrix Waste
Label Matrix Waste

I find the DLF220S complex; it takes time to learn and become proficient.  It’s not plug and play like other devices we sell.  Derek says, “it took me a full two weeks to really learn how to best use the DLF”.  And Derek is a professional printer!  If you start using a finishing system, plan to take some time to become productive.

L801 at Sierra Stickers

In addition to the C6500 and the Finishing Station, Derek also uses an Afinia L801 in his operation.  According to Derek, “we use the L801 for art with solid black or mix of heavy colors.  And we use the L801 on jobs requiring specific materials such as matte BOPP.  The L801 can produce vibrant colors; and that is an important benefit of the L801.”  In this video, Derek goes through the unboxing and setup of the L801:


Sierra Sticker Founders

In less than 6 months, Derek and his wife have built a thriving label printing business.  Further, I admire how they have used YouTube and other social media to promote their business and communicate the professionalism of their operation.  Sierra Stickers is a great small business run by intelligent entrepreneurs. 

If you are a printer and want to expand your business; be like Derek.  Start by contacting Color Label Solutions.  We’ll help build your business too.

Guy Mikel
855-962-7670

Wednesday, November 18, 2020

Organization Of The Year

I am pleased to announce that the Colorworks Label division of Epson has been named co-winner of the AIM “Organization of the Year” award.

AIM Organization of the Year


If you have never heard of this organization, AIM North America is the premier alliance for automated data capture technologies industry.  According to the AIM Press Release, “Epson has devoted their time to delivering efforts towards enhancing monochrome-only barcodes to labels that feature colors and images.” Learn more here: 

I mention this award for two reasons.  First, they deserve the recognition for the contributions to automatic identification and label printing.  And second; because I nominated them. 

Why you ask?  Below is the nomination recommend that I sent to AIM.

For the AIM 2020 Organization of the Year, I’d like to nominate Epson America for their success with on-demand color label printers.  This nomination results from Epson’s successful efforts to move from monochrome only barcodes to labels with colors and images.  Let me tell you a bit more about Epson’s generations of products and markets on-demand color printers serve.

Since the decade of the 2000’s, Epson has launched 6 generations of automatic identification, color label printers:


Catalina Printer
Catalina Printer

With the launch in the mid 2000’s, the Catalina printer became the standard for printing coupons in groceries across North America. Hundreds of thousands of these coupon printers were deployed, each producing coupons with barcodes.


C3400 Label Printer
C3400 Label Printer

At the end of 2000’s, Epson launch their first label printer; the TM-C3400. This 3-color printer was perfect for putting color marks on labels as well as barcodes. Here is a customer using the C3400 for color-codes for logistics, to reduce shipping errors:  


C831 Label Printer
C831 Label Printer

In 2012, Epson launch the GP-C831; specifically designed for GHS drum labels.  This pin-fed printer produced extremely durable (in combination with a new, inkjet coated, Kimdura), large labels perfect for chemical drums and the variable red pictograms required for GHS.  Here is a good example of a customer using the C831 printer: 

C3500 Label Printer
C3500 Label Printer

In 2013, Epson launched the TM-C3500, the upgrade to C3400.  This 4-color printer produced higher quality images, up to 5X faster and up to 60% less ink cost than the C3400.  Here is our first customer for the C3500, using color codes on their labels: 

C7500 Label Printer
C7500 Label Printer

In 2015, Epson launched the TM-C7500; a high resolution fast and durable label printer.  The combination of the C7500, C3500 and C831 fit chemical companies perfectly to meet the requirements for GHS.  Here is a post of our first customer using the C7500: 


C6000 Label Printer
C6000 Label Printer

In 2020, Epson launched the C6000 series of color label printers, bringing many new features/capabilities to the print on-demand color label printer market; including ZPL, Peel/Present, Color Management and Network Printer Management.   Here is a post of one of our customers using this new printer: 

On-Demand color label printers are changing the way companies produce labels. All of these examples use color and barcodes to help their internal employees, customers and regulators identify quickly the correct products.  Some of the market applications include the following segments:

Chemical: As mentioned previously, GHS and the need for color, variable pictograms jump-started the market for color label printers.  With the Epson printers, chemical manufacturers could print variable data, barcodes, images and pictograms on-demand.  Because of the capability to meet the GHS requirements, Epson printers became the de-facto standard in the chemical industry. Here, our customer NIC, produces great looking GHS labels:

Manufacturing: Companies producing a large number of SKU’s or organizations needing to produce variable images for retailers such as Home Depot and Lowe’s, need to manage their label inventory.  Print on-demand color makes it possible to reduce waste and manage label inventory.  Here is a good example of how manufacturers meet this requirement

Food:  With the requirements for variable data and barcodes on different SKU labels, many food companies have selected print on-demand color labels as the best process to meet these requirements.  For example, Foodie Fit uses color and barcodes to make it easy for their customers to select the correct product:

Trade Show/ID Badges: With the need for not only barcodes, but variable pictures and color codes, event organizers are moving to print on-demand color ID badges.  CES, the world’s largest tradeshow uses Epson’s printers to produce these badges:

Cannabis: With the need for variable data such as THC content and Lot Numbers; as well as the importance of branding, Cannabis manufacturers have moved to print on-demand color labels.  Given the legal requirements and the large number of strains/products, cannabis companies prefer generally, on-demand color labels; including cultivators like 14er's

Plus. companies in many other markets are benefiting from on-demand color for their labels with barcodes.


Finally, color label printers existed prior to the launch of Epson’s printers.  And many other color label printers have come into the market.  However, Epson has focused most of their innovations on printers designed for the automated identification segment of the label market.  Their printers fit this business.

Overall, color label printing has been the largest and most important innovation to automatic identification technology since thermal printers.  And Epson’s technology for durable and affordable labels and printer hardware has made this happen.

Guy Mikel
855-962-7670

Thursday, November 5, 2020

Multiple UP

Although I’ve written about printing multiple up labels in the past, I had an experience recently that may help you as well.
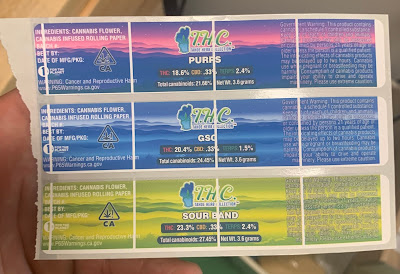
3 UP Printing
3 UP Printing

Our customer could not only get the labels to print full-bleed correctly and also was getting “strange” white bands in the labels.  Frankly, I had no idea what caused the white bands.  Do you? Full-bleed not printing correctly; I get this question all the time.

To print the multiple up, the customer created a PDF with the 3 labels and loaded them into the BarTender foreground. 
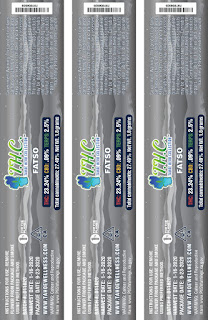
3 UP Image
3 UP Image

I’ve written before about printing multiple up using BarTender in the past:


https://colorlabelsondemand.blogspot.com/2020/03/printing-circles-with-c6000.html 


By creating the PDF for multiple up labels, you may have to make changes in the vertical gap measurements to get the full-bleed correct.  In addition, I suspected that the PDF would not work as well for this situation as an image file.


Given my concerns, I recommended that we change to a single label image.  Further, I recommended that we make the image 1/16th of an inch larger on all four sides than the actual label size.

1 UP Image

Once we had the image corrected, I started to setup a new template in BarTender.  First I added the correct size of the label (3.25” x 5”) to the Epson driver along with adding .03” to both orientations.


BarTender 3 UP Settings

Second, I configured the individual labels with a template size of 1.03” x 5.28”.  We always recommend an additional .03” to both orientations when printing full-bleed.

Multiplying this size by 3 (for the 3 UP label), I had a total width of 3.09”.  With a total width of 3.28” setup in the driver, I had .19” left for the two vertical gaps. Dividing the .19” by 2, I set each gap at .095”.


BarTender 1 UP Setting

In BarTender, setting up the gap and the actual template size is easier to do than creating a single PDF.  You can easily change the vertical gap size and retest the label print.

Once I had the size of the label set correctly, I embedded the single image in the background.

BarTender Background Setup

If the file was only the actual size, I may add it as an image rather than in the background.  By having the image slightly larger than the actual size, then I find adding it to the background is easier and better.  And in fact, you can add an “overhang” as well if required.

Once I had created and saved this file, I printed it on my C6500 printer.  And interesting enough, it printed perfectly the first time:

3 Up Perfect Full-Bleed

Further, by changing the extremely large, PDF file to an image and adding it to the background rather than the foreground, the strange bands disappeared.  I’m assuming the printer spooler had issues with the large file size combined with the BarTender file.

Once I sent the redesigned BarTender template, the customer printed on his C7500G.  Although it printed without the strange white bands, the full-bleed printing was off slightly vertically.  He then made a “position” adjustment in the C7500 Printer Setting Utility; and it worked perfectly.

We sell a lot of multiple up labels; especially given the minimum width requirements of 2” in the C7500/C7500G printers.  You can print multiple up labels using a PDF; but it is a lot easier to print using a label application like BarTender.

If you follow the process described above, you can create and print multiple up labels yourself easily and quickly.  If you need multiple up labels or help using an application like BarTender to print color labels on-demand, contact us.  We’d be glad to help.

Guy Mikel
855-962-7670

Sunday, October 25, 2020

Creating Label Art

Hawaii Food Products, https://www.hawaiifoodproducts.com/ , has been operating since 1955 and is a long-time kama'aina (a word describing Hawaii residents regardless of their racial background, as opposed to "kanaka" which means a person of Native Hawaiian ancestry) company with roots in the local farming community.  This company delivers the favorite Hawaiian food products in a ready-to-eat format under the Ono Ono brand. From Lau Lau and Kalua Pork to Lechon, Char Siu, and Lomi Salmon, Hawaii Food Products has it all.

Hawaii Food Products Logo

In 2019, Hawaii Food Products became affiliated with KOHA Foods. Their goals is to perpetuate quality, customer service, and responsible growth by employing local people who manufacture local foods grown at our farm and various local farmers. 

Brian Watanabe of Hawaii Food Products contacted us as they wanted to begin producing their own labels.  According to Brian, “To get the label costs down, we had to purchase 100,000 labels for each product.  Once we had the labels, we couldn’t make the changes required in our production process.  We needed flexibility and the ability to make changes on the fly.”

Continuing, Brian says, “For example, if we use Hunts Tomato sauce in a product and are forced to move to Del Monte Tomato sauce, we may need to change the ingredients on our label.  If we don’t, the FDA could easily tag our products.  On-Demand printing of our labels make these type of ingredient changes easy to do.”

Based on our discussions, Hawaii Food Products purchased a C6000A printer and a variety of label sizes.  The C6000A offers high print quality and is affordable, reliable and durable.  I’ve written extensively on this new printer:

First Post: Introduction to the C6000 Series


SITA is great. If the printer needs repair, Epson ships a replacement overnight.  We recommend SITA when label printing becomes a critical path to production.


With the purchase of the C6000, the next step was artwork.  According to Brian, “we can’t do everything ourselves.  Therefore, we need partners to help create the artwork; including redoing the logo’s.  With their expertise in labelling, we asked Color Label Solutions for assistance with artwork creation.”

With this request, our graphic artist Tony Molina stepped up and started working with Hawaii Food Products.  According to Tony, “initially, my goal was to build continuity into the label designs; with the use of colors and logos.  With new label projects, we need all of the original label elements to complete the project.  Many customers, however, don’t have the original artwork; therefore, we have to recreate them.  In this situation, I needed to recreate the logos (palm trees, etc.) from scratch which was the most difficult aspect of the project.

 
Hawaii Food Products Icon

Continuing, Tony says, “Once I had the logos, I worked on the other static aspects of the label; such as the US Inspected circle.  Completing the first label takes the longest as all of these items are required.  After the first, the follow-on labels take much less time.”

Hawaii Food Products Label Art

In this project, Tony was asked to recreate the company mascot as well.  From the original hand drawing:


Hawaii Food Products Mascot Draft


Tony created this mascot option:

Hawaii Food Mascot
Hawaii Food Products Mascot

and placed it on a label for Hawaii Foods:

Hawaii Food Products Art

Once the project was completed, Tony sent all of the original files to Hawaii Foods; a practice many or most graphic artists don’t follow.  We want to continue to earn our customer’s business; and not force companies to purchase from us by withholding original art.

Brian says “Tony did a good job on the labels; and just in time for a new shipment of Pasteles!  No way could I have done this artwork creation myself.  I’m unloading trucks, arranging our warehouse, creating new products; I don’t have the luxury for this type of work.  We need partners like Tony; and the price was worth the time I saved.”

As I have “ZERO” skills in the area of label design, I appreciate Tony’s capabilities.  If you need assistance with your label artwork, please contact us.  We can help with not only label production; but label creation as well.

Guy Mikel
855-962-7670

Tuesday, October 20, 2020

C7500 Plugged Nozzles

Plugged nozzles are the mostly likely service issue we’ve experienced with the C7500 or C7500G printer. 

C7500 Nozzle Check
C7500 Nozzle Check

When this issue occurs in the C7500, generally, I recommend first a manual cleaning.  To clean the nozzles on the C7500, use the right arrow on the front panel to select Menu, then the down arrow to select Maintenance and then select Manual Head Cleaning.  Or you can go into the driver to select Manual Head Cleaning as well.

C7500 with Rewinder
C7500 with Rewinder


If the manual cleaning doesn’t work, I sometimes recommend “Ink Recharge” selection from the Maintenance menu in the LED Operator Panel.  Ink Recharge forces ink into and through the printhead to eliminate any air in the ink lines.  Epson has told me that air in the lines can create similar missing dots.

Nozzle Check Setting

Also, I’ve recommend disabling the auto cleaning function to see if the printer can “print through” the plugged nozzle problem.  I’ve seen nozzles clear up by printing.
 
If the manual cleaning and ink recharge doesn’t work, the next option has been to contact Epson Advance Technical support for service on the printhead.  This service involved shipping the printer to Indianapolis or getting service on-site by a third party.  Now, we have another option to eliminate plugged nozzles.
 
General Data Service

General Data Service Department offers now a remote tool that may be able to unplug nozzles and improve print performance.  According to Bradley Whited, Technical Support for General Data, “Specifically for Epson printers we have been provided with a tool that assists with our depot repairs to make fine adjustments to the printer after any hardware replacements. This tool does include a function that can force a harder cleaning on the printer to try and clear clogged nozzles. In order to do complete this work, we connect remotely, install the tool, run the cleaning, and then uninstall the tool before disconnecting.”  Although we’ve sold hundreds of the C7500 printers, I didn’t know this capability exists.
 
GDC Service Team
GDC Service Team

When asked about training on the C7500, Bradley said, “We actually have 2 technicians in the depot including myself that have gone to Epson’s repair center in Indiana for certification on the Epson C3500 and C7500 printers.  In addition, we’ve trained other depot technicians; including one in California.  Overall, General Data has experience working on Epson label printers as well as from all major manufacturers. We are able to service all types of printers including thermal, line, laser, and solid ink as well as copiers and scanners.”
 
GDC Service Fleet
GDC Service Fleet
After hearing about the remote possibility to clear up plugged nozzles, I asked Bradley, when should you not use the remote capabilities.  Bradley said, “Remote service cannot assist with any issues determined to be hardware related.”  If hardware is the problem, General Data offers Return to Depot service or even On-Site service if the customer is local to a trained GDC technician.  Continuing, Bradley adds, “GDC is partnered with Epson and are able to get OEM parts to use in our repairs.”
 
If you have plugged nozzles, we charge $140 per incident currently to use the remote tool to unplug C7500 nozzles. 
 
According to Dennis Moore, Regional Service Representative for Epson, “The advanced cleaning tool is a last resort option for clearing nozzles on a C7500 or C7500G.  It is a valid option/utility before resorting to on-site or return to depot service.”
 
It’s great to hear that we now have another tool to help our customers with potential issues with C7500 printers.  Contact us if we can help.
 
Guy Mikel
855-962-7670
info@colorlabelsolutions.com


Sunday, September 27, 2020

Mi Nueva C6500P

Gracias a mi grupo que habla Español y mis sinceras disculpas por cualquier error gramatico que quizás encuentren en este blog.  


Cuando recibí mi primera impresora Epson C6500P.

La C6500P En La Caja
La C6500P En La Caja 

Al probar esta nueva tecnología de Epson, y después de abrir la caja pensé que quizás encontrarían mi experiencia un poco interesante. Igualmente, pueden encontrar mi publicación de introducción en las impresoras de la serie C6000 de Epson, también de interés: https://colorlabelsondemand.blogspot.com/2019/09/new-c6000-series.html

Después de sacar la impresora de la caja, inicié la impresora primeramente sin instalar la tinta y trate de instalar el controlador, pero tuve problemas instalando el controlador. Me di cuenta que la instalación tenia que hacerse en el panel de LED en la misma impresora y no por medio de el controlador en la computadora.  C6500 Driver: https://epson.com/Support/Printers/Label-Printers/ColorWorks-Series/Epson-ColorWorks-CW-C6500P/s/SPT_C31CH77201 .  La inicialización tomó mas o menos unos 20 minutos. (mas tiempo que la impresora Epson C3500) Después de terminar el proceso de la iniciación, ya pude instalar el controlador sin problemas.  Después de todo este proceso, aprendí que el proceso de inicialización consume aproximadamente 50% de la tinta que la impresora inicialmente tiene. (similar a la Epson C3500). 

C6500 Driver
C6500 Driver


Al final del proceso de inicialización, trate de verificar la versión de la “firmware” para ver si estaba al día. Desafortunadamente encontré que no estaba al día. No me sorprendió mucho esto porque estas impresoras son completamente nuevas. Lo bueno es que pude encontrar la última versión de la “firmware” en la misma página web de Epson, donde se encuentra el controlador de la impresora.

C6500 Firmware Update
Instalación de la última versión de la “firmware” para la impresora C6500

Encontré el proceso de actualizar la “firmware” muy comparable y similar a mi barata impresora Epson Multifuncional WorkForce 4720.

Una vez que logré instalar el controlador y la última versión de la “firmware”, decidí imprimir unas etiquetas de papel mate. Para mí fue muy fácil colocar el rollo de etiquetas de papel usando los ejes. Si alguna vez han usado la impresora LX2000, se darían cuenta que el proceso de la impresora C6500 es mucho más fácil. (Por favor visite mi poste anterior donde comparo la LX2000 con la C7500 y consulte la sección donde se coloca el papel).  

Carrete de papel para la C6500

Para el papel mate, seleccioné la opción de calidad normal;

Configuración del papel para la C6500

Adicionalmente, cambié el perfil de la tinta en la opción de ajustes más avanzada a la configuración más oscura. Les recomiendo que hagan este cambio en la mayoría de sus trabajos de arte y aplicaciones.

Perfil de tinta para la C6500

Finalmente, asegúrese de configurar el cambio a "Rebobinar" si no está utilizando la función de Despegar y Presentar:

Después de configurar el cambio de impresión en la C6500

De lo contrario, la impresora le indicará que tiene que quitar la etiqueta.  Si no se cambia esta configuración, la siguiente etiqueta no le imprimirá correctamente. Usted puede mover un poco la etiqueta ligeramente y la siguiente etiqueta le imprimirá sin problemas.

Encontré la calidad de impresión y la velocidad muy buena. (aproximadamente la misma que la de LX2000)

 
Etiquetas de papel mate para la C6500

Después de imprimir las etiquetas usando papel mate, decidí cambiar las etiquetas a papel brillante. Imprimí utilizando estas dos opciones. Calidad y Calidad Máxima.  Con un poco de atención, observe las diferencias en la barra verde y tal vez en el bloque rojo. Yo noté una ligera diferencia en los colores, pero muy poco.  Francamente, mi opinión es que no creo que la gran mayoría de las personas van a utilizar la opción de la Calidad Máxima.
Etiquetas de Papel Brillante para la C6500

Usando la opción de Calidad Máxima, en un papel brillante por ejemplo, puedes obtener la más alta y máxima resolución, pero con la velocidad más lenta que ofrece la impresora.  Por favor mire el video para que vea la diferencia cómo se imprimen dos etiquetas.  


Bueno, después de imprimir unas cuantas etiquetas, intenté probar la función que tiene la impresora C6500 de despegar la etiqueta automáticamente. Cambié la configuración del controlador a la “Aplicación Manual”; coloqué el respaldo de la etiqueta en el lugar donde la etiqueta se despega. La función de Despegar y Presentar funciono perfectamente!

La característica Despegar y Presentar de la C6500P

Ninguna otra impresora de etiquetas de color ofrece esta increíble función. Si usted tiene operadores en una línea de trabajo, imprimiendo y aplicando las etiquetas a mano, esta función le ayudara aumentar su productividad.  Por favor tenga en cuenta que esta función de Despegar y Presentar no tiene sistema de cortar la etiqueta.

Después de usar la función de Despegar y Presentar, probé la nueva forma de reemplazar el color de tinta plana en el controlador Epson. Con esta función, la impresora automáticamente puede reemplazar un color por otro.  Usando la utilidad en la configuración de la impresora (en la sección de datos acumulados), establecí un nuevo valor en los colores RGB para poder reemplazar un color existente.

Configuración de color de tinta plana de la C6500
Configuración de color de tinta plana de la C6500 


A continuación, usted puede seleccionar el color en la sección definida en el controlador:

Configuración de color de tinta plana en el controlador de la C6500
Configuración de color de tinta plana en el controlador de la C6500 


También se puede cambiar los colores de la impresión final sin cambiar la ilustración o el arte. En la imagen de abajo se puede mirar como el bloque azul tiene un color diferente. Una vez más, no tengo conocimiento de ninguna otra impresora que ofrece esta capacidad.

Reemplazo de tinta plana en la Epson C6500. Da te cuenta en las diferencias de los colores azules C6500

Esta característica parece funcionar solamente con trabajos de arte y ilustraciones que se han creado con el sistema RGB y no con el sistema de CYMK.  Espero tener más información acerca de el reemplazo de color de tinta plana muy pronto.

Después de hacer diferentes pruebas con esta impresora, trate de alimentar el papel usando el ingreso posterior de etiquetas de gran tamaño como 8.375" x 13.875". Concluí que la C6500P es un reemplazo perfecto para la impresora Epson C831. Con grandes etiquetas y la habilidad de abrir el gabinete y poner estas etiquetas por detrás, encontré esto muy conveniente.
 

Usando el ingreso posterior para etiquetas de gran tamaño para la C6500 

Usando el ajuste Sintético en la opción de Impresión Calidad Normal, encontré que la velocidad de imprimir fue más rápida de lo que yo esperaba; probablemente más rápida que la impresora C831.  Mírame imprimir una etiqueta larga aquí en este video:


Y también encontré la calidad de imprimir las etiquetas mejor de lo que yo esperaba en comparación a la impresora Epson C831.


Calidad de etiquetas para tambores imprimidas con la C6500P


Después de probar estas etiquetas para tambores, decidí tratar la función de Despegar y Presentar usando etiquetas de tamaño de 8.375" x 13.875". Descubrí que la función de Despegar y Presentar funciono muy bien!

Despegar y Presentar usando etiquetas para tambores de gran tamaño con la C6500P

Esta grande etiqueta se pegó un poco en el respaldo donde la etiqueta se despega, pero se soltó sin problemas cuando le jale suavemente. La función de Despegar y Presentar me parece una opción perfecta para las etiquetas de tambores químicos.  Les sugiero a los propietarios de impresoras C831 de Epson, que observen y consideren la nueva impresora C6500P de Epson tan pronto come les sea posible.

En general, encontré mi experiencia con la nueva impresora C6500P de Epson muy positiva.

Alta calidad de impresión, operación fácil, características únicas como Despegar y Presentar, reemplazo de tinta plana e ingreso posterior para etiquetas de gran tamaño hacen que la impresora C6500 de Epson sea una gran alternativa a otras impresoras como la Primera LX2000, LX900 o LX1000; de VIP como la VP485 y la VP495; o de Neuralabel, la 300x.  Definitivamente, si usted tiene una de estas impresoras, debería seriamente considerar la posibilidad de reemplazarlas con la Epson C6500.
 
Después de todo, no probé varias de las nuevas características; como el controlador para las computadoras MAC, administración remota de impresoras o puerto de I/O. Pero no pierda cuidado, haremos estas pruebas y más en un futuro no muy lejano. Recuerde de ver mi publicación poste acerca de la impresión con ZPL aquí:  

Si encuentran las características de las impresoras C6500A o C6500P de interés, por favor póngase en contacto con nosotros. Siempre haremos lo más posible en ayudarles con la educación de esta nueva tecnología y demostrarles lo fácil que es aprender como imprimir sus propias etiquetas.
 
Guy Mikel con Beatriz, Tony y Grace
855-962-7670